
Deploying software to multiple endpoints efficiently(Bulk Software Deployment) is one of the most critical responsibilities an IT administrator manages in a modern organization. Whether your workforce is fully remote, hybrid, or distributed across branch offices, keeping every device updated, secure, and running the right applications requires a structured, policy-driven approach that scales without adding manual effort.
This guide walks you through the complete process of bulk software deployment using Zecurit Endpoint Manager. From setting up your software repository and configuring packages to building deployment policies and scheduling fleet-wide rollouts, every step maps directly to a real screen inside the Zecurit platform.
By the end of this guide, your IT team will be able to deploy software to 1000+ endpoints automatically, silently, and reliably, without requiring user interaction, VPN dependency, or a single remote desktop session.
Bulk software deployment is the process of installing, updating, or removing applications across a large number of managed endpoints simultaneously, using automated policies rather than manual installation methods.
Managing software manually across hundreds or thousands of machines is not just time-consuming. It is practically impossible without the right tools. Every missed update, failed installation, or inconsistent configuration creates security vulnerabilities, compliance risks, and productivity losses across your organization.
Modern bulk deployment tools like Zecurit replace manual installation workflows with a centralized, policy-based system. IT administrators configure how software should be installed once, assign that configuration to a group of devices, and the platform handles delivery, execution, retry logic, and reporting automatically across every endpoint in the fleet.
The result is consistent software versions on every device, zero end-user disruption, and full audit visibility from a single console.
The Software Repository is the starting point for every deployment in Zecurit. It is a centralized library where all application packages are stored, versioned, and made available for fleet-wide deployment. Packages stored here can be reused across multiple deployment policies without re-uploading or reconfiguring them each time.
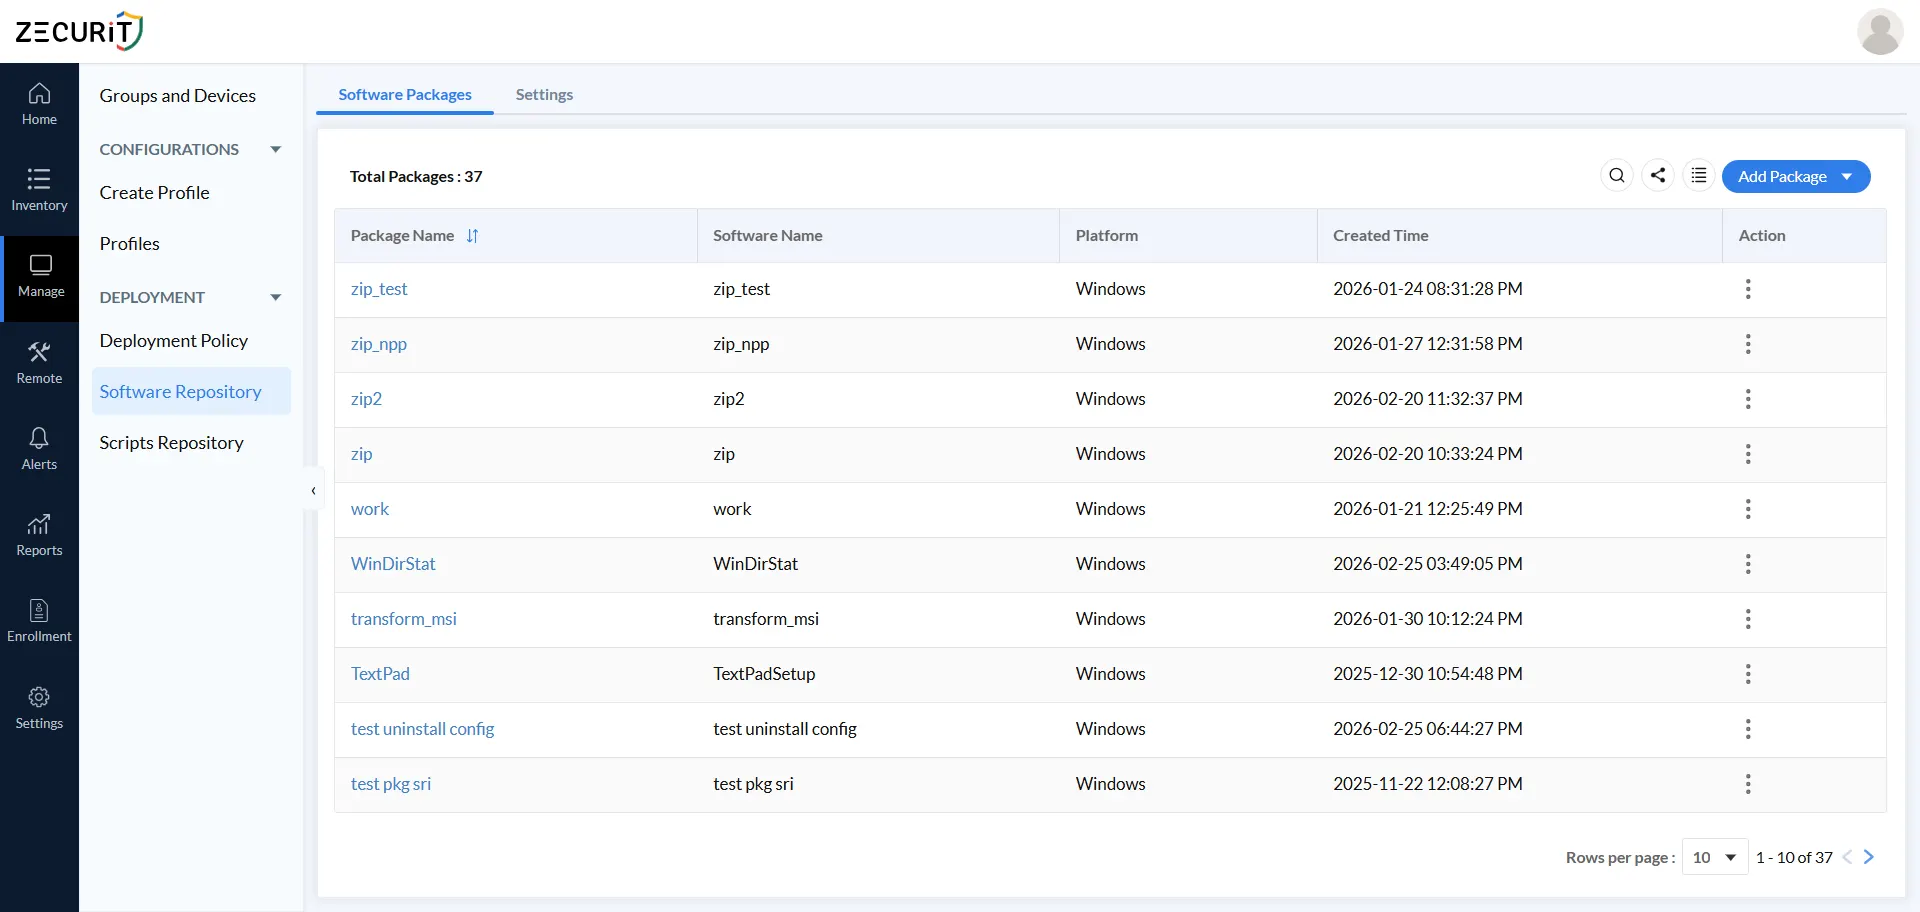
Navigate to Manage -> Deployment -> Software Repository -> Software Packages to view your package library. The dashboard shows each package's name, software name, platform, creator, and creation time at a glance.
Click Add Package to begin configuring a new deployable application. Every package you add requires three foundational decisions.
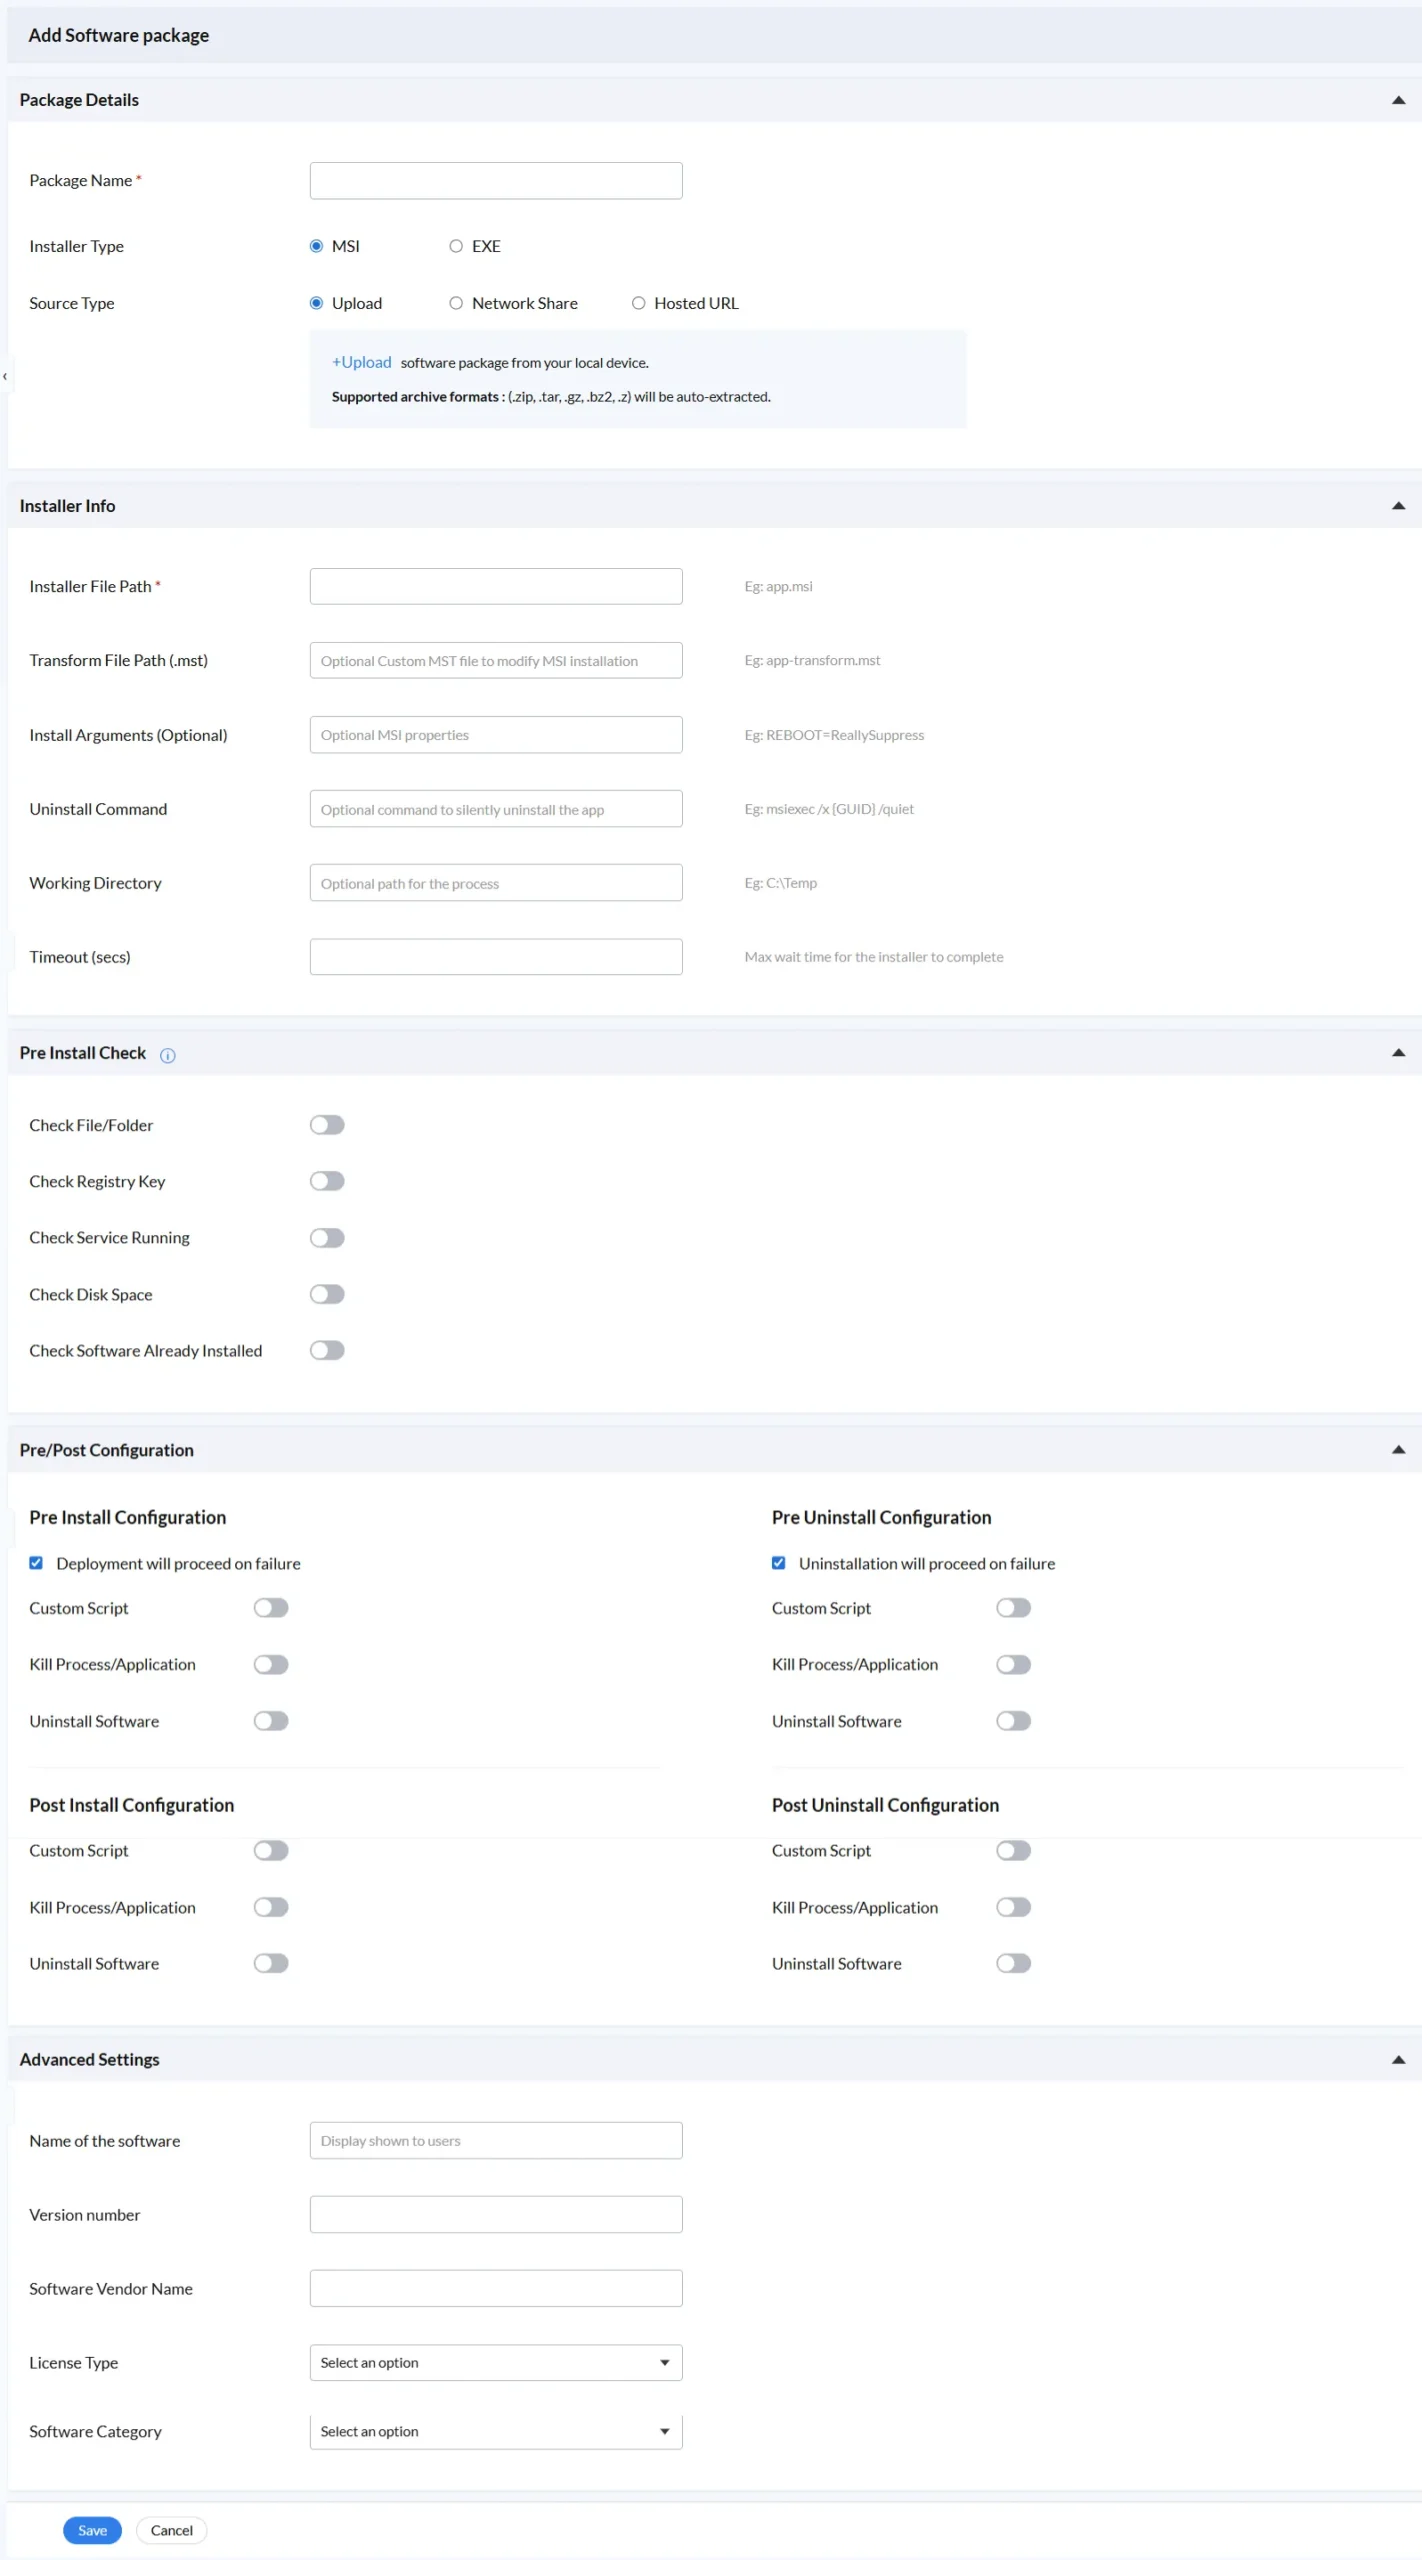
Package Name is the unique internal identifier for this package in your repository. Use a name specific enough to distinguish between versions and variants. For example, "7-Zip 23.01 x64" is more useful than just "7-Zip" when managing a library of dozens of packages across multiple platforms.
Installer Type determines the format of your installer file. MSI is the recommended format for Windows enterprise environments because it supports silent installation natively, accepts command-line properties for customization, supports transform files for configuration, and integrates with Windows Installer for proper tracking, repair, and removal. EXE installers are also fully supported and cover commercial applications that ship as self-extracting executables. EXE deployments typically require more careful configuration of silent install arguments to achieve fully unattended behavior.
Source Type is one of the most strategically important decisions in the package setup, particularly for large-scale deployments. Three options are available:
The Installer Info section defines exactly how Zecurit runs the installer silently on each target device. Getting these fields right is what separates a reliable enterprise deployment from one that fails inconsistently across your fleet.
Installer File Path is the only required field and specifies the exact path to the installer file within your package. For a flat package, this is simply "app.msi". For a package extracted from an archive with subfolders, it might be "subfolder/setup.msi". Verifying this path against your actual package structure before deploying at scale prevents the most common cause of deployment failures.
Transform File Path (.mst) enables MSI customization without modifying the original installer package. A transform file applies configuration on top of the base installer during execution, allowing you to pre-configure installation options, disable unwanted features, set default settings, or inject license information. For enterprise-standard applications like Microsoft Office or Adobe products, transform files are the standard mechanism for fleet-wide customization.
Install Arguments pass command-line properties directly to the MSI installer. The most commonly used enterprise deployment argument is REBOOT=ReallySuppress, which prevents the installer from forcing an immediate system restart after installation. Other frequently used arguments include ALLUSERS=1 for machine-wide installation and application-specific properties that configure features or license keys at install time.
Uninstall Command stores the command needed to silently remove the software when a policy is set to Uninstall. The standard Windows Installer syntax is msiexec /x {GUID} /quiet. Capturing this at package configuration time means that when you need to remove software fleet-wide under time pressure, the removal can be deployed in minutes rather than requiring administrators to research GUID values and test uninstall syntax on the fly.
Working Directory sets the file system path from which the installer process executes. Some installers require their working directory to be set to the folder containing supporting files. A common value is C:\Temp when installers need local write access during execution.
Timeout (secs) defines the maximum time the deployment agent will wait for the installer to complete before marking the installation as failed. A simple utility might finish in 30 seconds while a complex enterprise application could legitimately take 20 minutes. Setting the timeout too short generates false failures; setting it too long means hung installations block the deployment queue unnecessarily. Match the timeout to the expected install duration of your specific package.
Organizations that store software packages on internal file servers can configure a network share path directly in the Software Repository Settings tab. Administrators specify the share path and optionally add credentials so that every enrolled device agent can securely retrieve the package from the local infrastructure automatically.
This is especially valuable for branch office rollouts and large package deployments where pulling gigabyte-sized installers from cloud storage over WAN links would be impractical. Once configured, every device on the network retrieves the package from the local file server at LAN speeds with no manual file transfer or administrator involvement.
Before any installation begins, Zecurit validates that each target device meets the conditions required for a successful deployment. These automated checks run silently on every device in your fleet before the installer is triggered, and they prevent the most common causes of failed or incomplete installations at scale.
Each check is independently toggleable. Enable only the checks that are relevant to your specific package and target environment to keep the pre-deployment phase fast and accurate.
This check verifies that a specific file or directory exists on the target device before installation proceeds. Use it when your software has a file-based prerequisite such as a required runtime, a supporting library, or a configuration file that must be present for the installation to succeed. It can also verify that a previous deployment step completed correctly by checking for a file it should have created.
This check queries the Windows registry for a specific key or value before proceeding. It is useful for verifying that a prerequisite application is installed and properly registered, confirming that a required configuration value is present, or detecting a conflicting application that would prevent successful installation.
This check verifies that a specified Windows service is in a running state before deployment proceeds. Use it when your software installation depends on a running service such as a database engine, a network service providing dependencies, or an agent that must be active to support the deployment itself.
This check confirms that the target device has sufficient free disk space before attempting installation. Running out of disk space mid-installation is a particularly damaging failure mode because it can leave the software in a partially installed state that requires manual remediation. Set a minimum free space requirement that accounts for the installer size, the installed software footprint, and a reasonable buffer. This single check prevents an entire category of deployment failures that are difficult to diagnose and time-consuming to fix.
This check queries the device's software inventory to determine whether the target application is already present at the current or a higher version. Enabling it prevents redundant installations on devices that are already compliant, saving network bandwidth, processing time, and log noise. At scale, eliminating unnecessary deployments to up-to-date devices also makes your compliance reporting more accurate by reflecting true installation gaps rather than re-runs.
The Pre/Post Configuration section is where Zecurit's deployment model goes beyond basic software delivery. It provides four independent automation phases: Pre-Install, Post-Install, Pre-Uninstall, and Post-Uninstall. Each phase has three independently configurable action types that can be combined in any combination.
This structure gives IT administrators precise control over every phase of the software lifecycle, not just the installation itself.
Actions in this phase run before the main installer executes. The "Deployment will proceed on failure" option is enabled by default, meaning that even if pre-install actions encounter errors, the main installation will still proceed. This is appropriate when pre-install steps are best-effort preparations rather than hard requirements. Disabling this option makes pre-install success a strict requirement: if any pre-install action fails, the entire deployment halts on that device.
Custom Script allows you to execute a PowerShell script, batch file, or shell script at this point in the deployment lifecycle. Pre-install scripts are commonly used to close applications that would conflict with the installer, set registry values required by the installation, create directory structures, or log deployment metadata before the install begins.
Kill Process/Application is one of the most practically valuable options for large-scale deployments. Attempting to update a running application, particularly browsers, office suites, PDF readers, or security tools that lock their own executable files, is a frequent cause of installation failure. Configuring this option in the pre-install phase ensures these processes are terminated cleanly before the installer tries to replace their files, which significantly improves first-attempt success rates across your fleet.
Uninstall Software in the pre-install phase handles version upgrade scenarios where the new installer requires the old version to be removed first. Rather than managing a separate uninstall policy followed by an install policy, this option packages the removal and installation into a single atomic deployment action, simplifying both the policy structure and the tracking.
Actions in this phase run after the main installer completes successfully. Post-install custom scripts are the standard mechanism for application configuration that must happen after the installer has placed its files. Common uses include registering the application with a license server, configuring proxy settings, setting up scheduled tasks, or triggering a service restart to finalize the installation.
These phases mirror the install phases but apply to software removal workflows. Pre-uninstall actions prepare the device for removal, such as closing the application and backing up user data. Post-uninstall scripts handle cleanup that the uninstaller does not perform automatically, such as removing leftover directories, cleaning orphaned registry entries, or notifying dependent systems that the application has been removed.
The Advanced Settings section of a software deployment form. It contains five input fields: software display name, version number, and vendor name as text fields, while License Type and Software Category are dropdown menus with "Select an option" as default. These fields help administrators organize and categorize software packages with metadata before deploying them to endpoints.
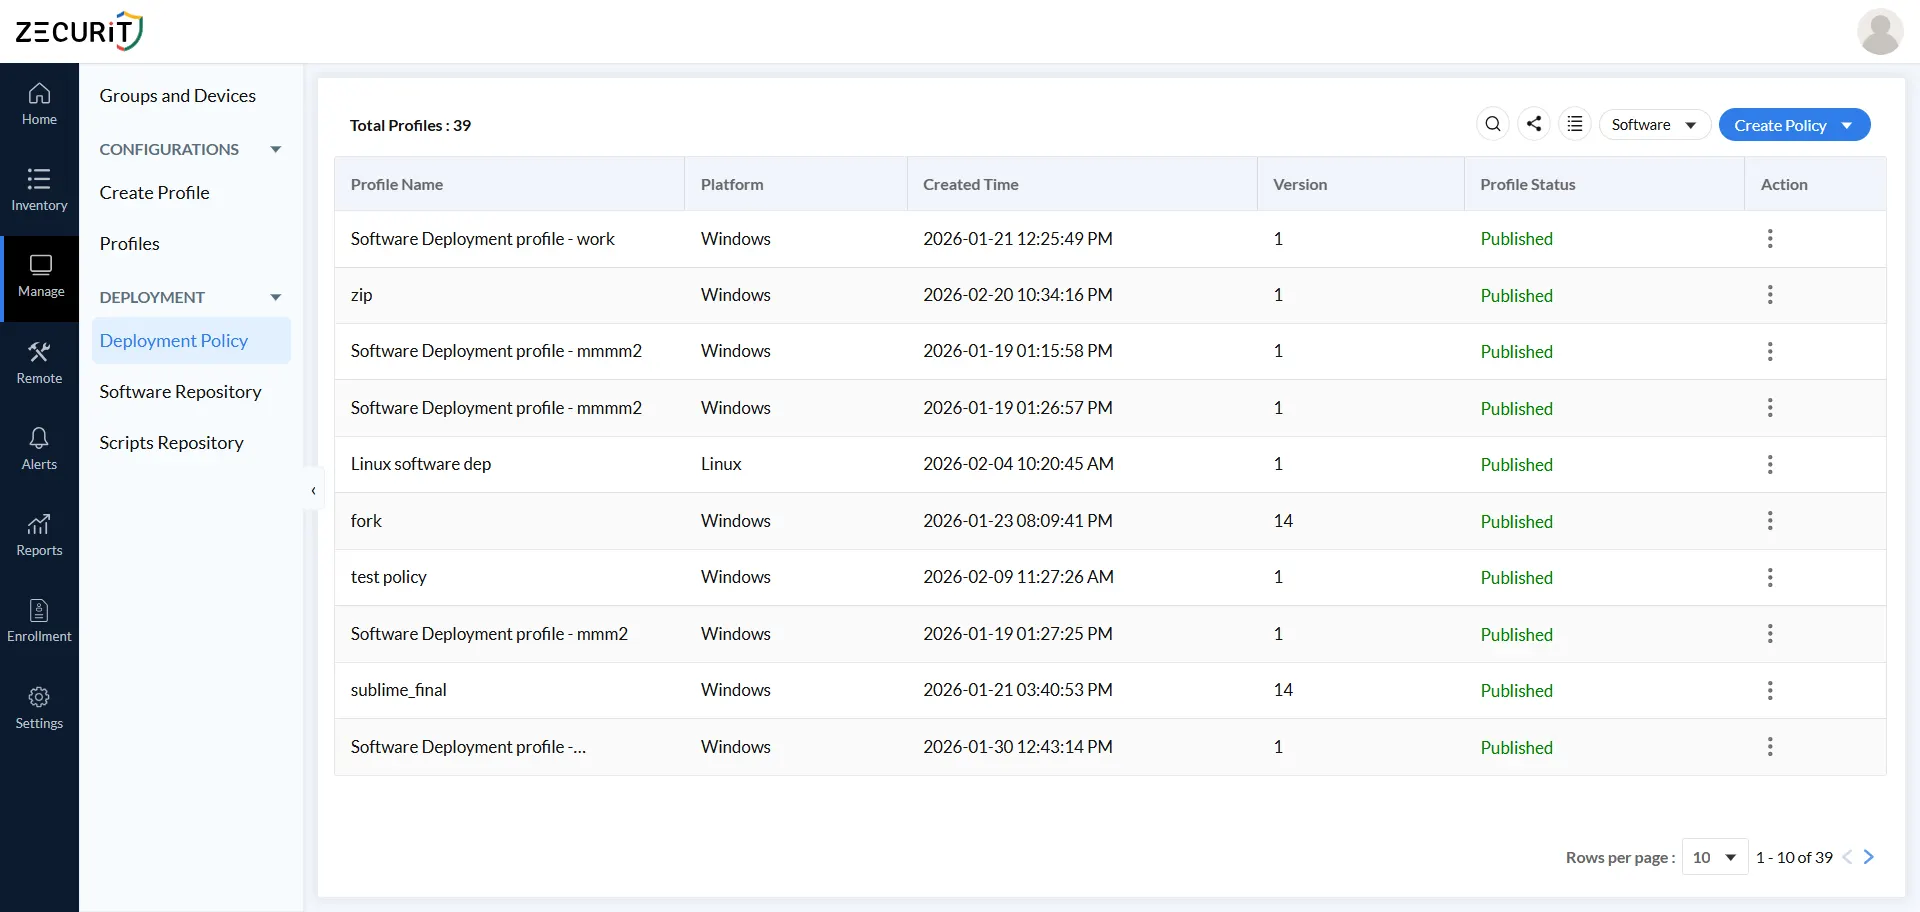
A deployment policy is the configuration that connects a software package to your target devices. It defines what gets installed, how it runs, when it deploys, and what happens if something goes wrong. Navigate to Manage -> Deployment -> Deployment Policy -> Add Deployment Policy to create a new one.
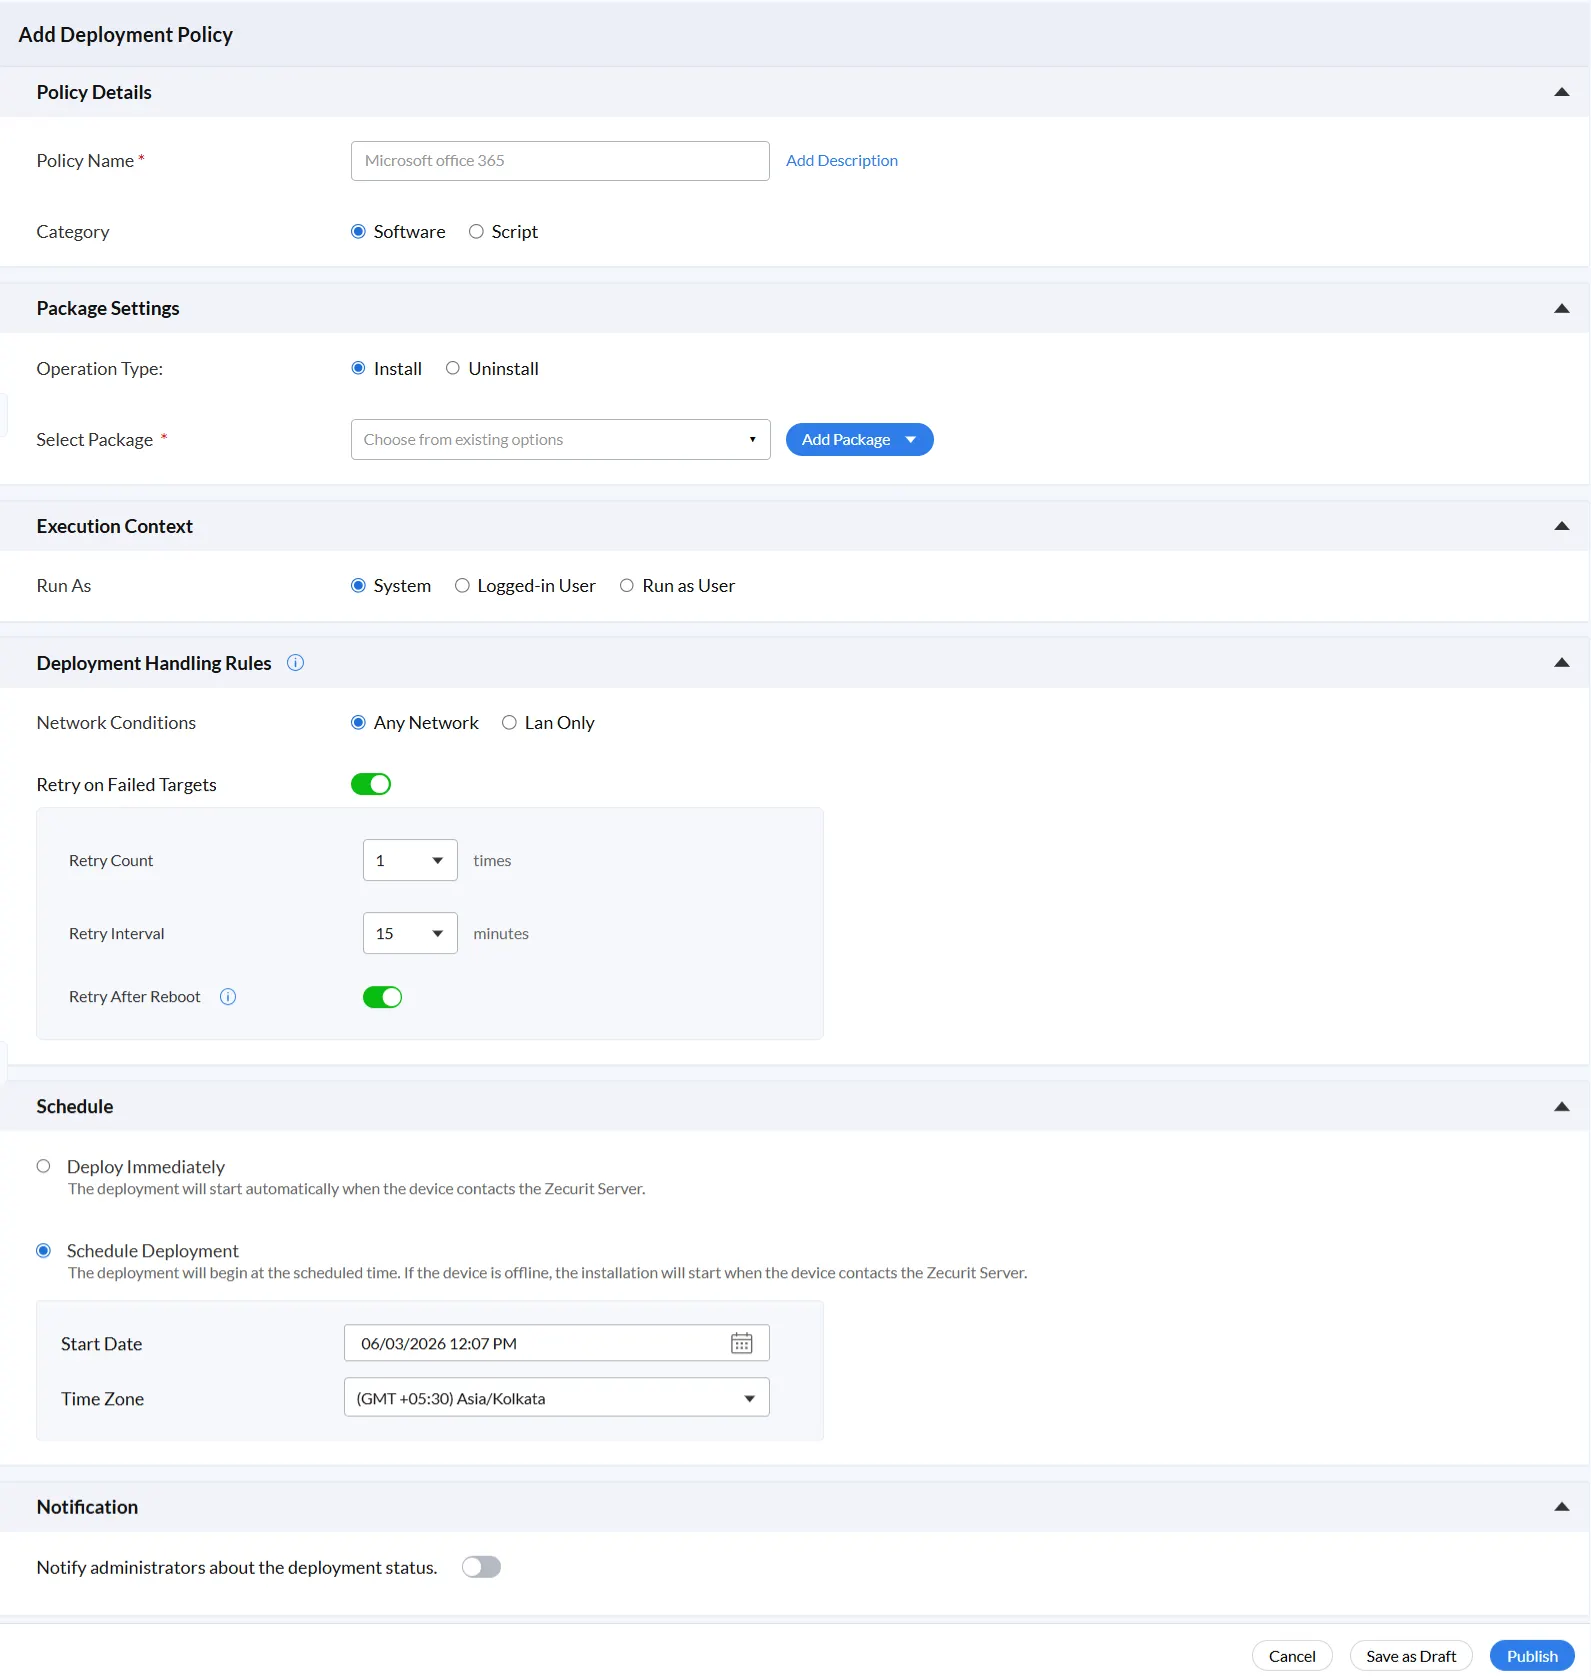
Policy Name is a required field. Use a naming convention that any member of your IT team can understand at a glance without opening the policy. A recommended format includes the software name, target environment, and rollout phase, for example: "Microsoft Office 365 - All Staff - Q1 2026".
The Add Description field is optional but valuable. Use it to capture the business justification for the deployment, the change ticket number, the approving manager, and any special instructions. This transforms your policy library from a technical artifact into an auditable business record.
Category toggles between Software (to deploy an application package) and Script (to execute a script-based operation). This selection determines the entire configuration workflow that follows.
Operation Type determines whether the policy installs or uninstalls the selected software package. By handling software removal through the same policy framework as installation, with the same retry logic, scheduling, and notifications, the platform ensures that software retirement is as controlled and auditable as software deployment. When a vendor announces end-of-life or a security vulnerability requires immediate removal, a policy-driven uninstall workflow means you can act across 1000+ endpoints in minutes rather than days.
Select Package connects the policy to a specific package from your Software Repository. If the required package has not been added yet, click Add Package to create it inline without losing your policy configuration progress.
Execution context defines the user account and privilege level under which the installer runs on each target device. Choosing the correct context is one of the most important decisions in the policy configuration because it directly determines whether deployments succeed consistently across your fleet.
System runs the installer with full administrative privileges on the local device. This is the default and most widely used option for enterprise deployments. It executes regardless of whether a user is logged in, making it the only reliable choice for servers, kiosks, shared workstations, and unattended devices. Use System context for any software that installs to system directories and does not require user profile access.
One important note: System-level access is unrestricted, so validating packages before adding them to your repository is essential. A misconfigured or compromised package deployed fleet-wide under System privileges would have unrestricted access to every target device.
Logged-in User runs the installer under the currently authenticated user's session. Use this for browser extensions installing per user, productivity apps registering user-specific licenses, or desktop customization tools writing to user profiles. The key operational consideration is that this context will not execute on devices with no active session. Across a large fleet, servers, kiosks, and devices at the login screen will all defer deployment until a user logs in, which affects your actual coverage count. Plan scheduling accordingly.
Run as User executes the installer using securely stored credentials from the Zecurit credential vault. Use this when deployments need to authenticate to network resources, access domain shares, write to authenticated network paths, or when compliance requires installation under a specific non-privileged account rather than full System privileges. Credentials are pre-configured in the vault and referenced by name, so passwords are never visible in policy configurations or accessible after saving.
The Add Credentials dialog stores authentication credentials securely in the platform vault. Credentials are referenced by name across multiple policies and never displayed after saving.
Credential Name should follow a clear naming convention. "Corp-AD-DeployUser-Prod" is far more useful than "Credential 1" when managing dozens of policies at scale.
Credential Type covers Active Directory for domain-joined Windows environments and Workgroup/Local Account for standalone workstations or machines outside the domain.
The key benefit at scale is that a credential stored in the vault requires only one update during rotation. There is no need to hunt through scripts or policy configurations to find every hardcoded instance of a password.
At 1000+ endpoints, deployment failures are inevitable. Devices reboot mid-installation, connections drop, antivirus tools lock installer files, and machines go to sleep at the wrong moment. Deployment Handling Rules are your automated response to all of it.
Network Conditions controls where deployments execute. Any Network covers corporate LAN, VPN, Wi-Fi, and cellular connections, which is essential for remote and hybrid workforces. LAN Only restricts deployments to on-premises connections, appropriate for large packages where bandwidth or security requirements make cloud delivery impractical.
Retry on Failed Targets eliminates the need for manual ticket-investigation-redeploy cycles after every failure. When enabled, the platform retries automatically based on two configurable settings. Retry Count defines the number of additional attempts after the initial failure. A range of 1 to 3 is recommended, as higher counts can mask persistent problems that need human attention. Retry Interval defines the wait time between attempts. The default of 15 minutes is long enough for transient issues like busy CPUs or temporary file locks to resolve, and short enough to keep the deployment window manageable.
Retry After Reboot ensures that device reboots never permanently interrupt an installation. When enabled, the Zecurit agent automatically resumes the deployment the next time the device starts up, covering scenarios where a system restart occurred mid-installation or during the deployment window.
Deploy Immediately triggers installation at the next device check-in with the Zecurit server. Use this for urgent security patches, zero-day remediations, or compliance-mandated updates where speed outweighs the inconvenience of an unscheduled installation.
Schedule Deployment sets a specific start date, time, and time zone for your rollout. Offline devices are not excluded: if a device is powered down at the scheduled time, the installation begins automatically the next time it contacts the server. This ensures remote workers and branch office devices are never permanently missed due to being offline during the scheduled window.
For 1000+ endpoint rollouts, overnight or weekend maintenance windows are strongly recommended. They avoid disrupting user productivity with unexpected installation prompts or reboots, distribute network load across low-utilization periods, and allow your IT team to monitor deployment results during normal business hours rather than watching dashboards through the night.
Time Zone selection is essential for global fleets. Setting the correct time zone ensures deployments reach target devices at the intended local time rather than an arbitrary server default, which is the difference between hitting a maintenance window and interrupting a business-hours meeting.
The Notification toggle controls whether administrators receive automatic alerts about deployment status. Enabling it ensures your team is informed about deployment outcomes without needing to manually check the dashboard.
For large-scale deployments, proactive alerts reduce the time between deployment completion and administrator awareness. When a deployment fails on a subset of devices, notifications allow your team to respond immediately rather than discovering the issue during a later review or, worse, through a wave of help desk calls.
In mature IT operations, notification alerts feed directly into ticketing systems and escalation workflows, automatically creating and assigning help desk tickets the moment a failure is detected. This approach is far more effective than periodic manual log reviews for teams managing distributed endpoint fleets.
Configure your software repository fully before creating deployment policies. A well-structured repository with consistent package naming, accurate metadata, and pre-validated installer paths is the foundation that every deployment depends on. Cutting corners here creates compounding problems with every rollout that follows.
Before rolling out to your entire fleet, assign the deployment policy to a small pilot group of 10 to 20 devices. Monitor for 24 to 48 hours, review the deployment logs for failures or unexpected behavior, and validate the installed application on a sample of pilot devices. Only expand to broader groups after the pilot confirms the deployment is working as expected.
Group-based targeting is the most efficient way to manage software deployment across large device fleets. Organize devices into logical groups by department, location, or platform. Assign deployment policies to groups rather than individual devices so that new devices added to a group automatically receive all associated deployments without any additional configuration.
Choose the execution context based on the software's technical requirements, not convenience. Use System context for applications that install to system directories and do not require user profile access. Use Logged-in User for user-scoped applications that install to user profiles. Use Run as User when the installation needs authenticated network access. Getting this wrong is one of the most common causes of silent deployment failures that are difficult to diagnose.
Review the expected installation duration for each package before setting the timeout value. A timeout set too low generates false failure reports for legitimate long-running installs. A timeout set too high delays detection of genuinely hung installations that are blocking the deployment queue. For most business applications, a timeout between 300 and 900 seconds covers the realistic installation window.
Turn on administrator notifications for every deployment policy in production. The operational benefit of knowing about a failure within minutes of it occurring, rather than discovering it hours later, is significant for any team responsible for keeping a large fleet compliant and secure.