Zecurit Remote Access provides a comprehensive set of session features that help technicians collaborate with users, transfer files, perform administrative tasks, and troubleshoot devices efficiently during remote sessions.
This guide explains the features available within the Remote Viewer and how they can be used to improve remote support and unattended remote access operations.
Overview
When a remote session is established, the Remote Viewer provides access to various tools and collaboration features through the session toolbar.
These tools enable technicians to:
- Communicate with end users
- Transfer files securely
- Execute administrative commands
- Monitor session activity
- Share clipboard content
- Record notes
- Collaborate with additional technicians
- Manage multi-monitor environments
Depending on permissions and operating system capabilities, available features may vary.
Session Toolbar
The Remote Viewer toolbar provides quick access to commonly used remote management features.
Available options may include:
- Commands
- Chat
- File Transfer
- Monitor Selection
- Session Notes
- Device Information
- Invite Technician
- Full Screen Mode
- Disconnect Session
These tools are designed to minimize troubleshooting time and improve technician productivity.
Chat
The Chat feature allows technicians and end users to communicate during a remote session without requiring a separate messaging application.
Chat can be useful when:
- Gathering troubleshooting information
- Guiding users through a process
- Requesting permission before making changes
- Explaining maintenance activities
- Providing status updates
Starting a Chat Session
- Connect to a remote device.
- Click Chat from the session toolbar.
- Enter your message.
- Press Enter to send.
Messages are delivered instantly to the connected user.
Benefits of Chat
- Faster issue resolution
- Improved user communication
- Reduced misunderstandings
- Better support experience
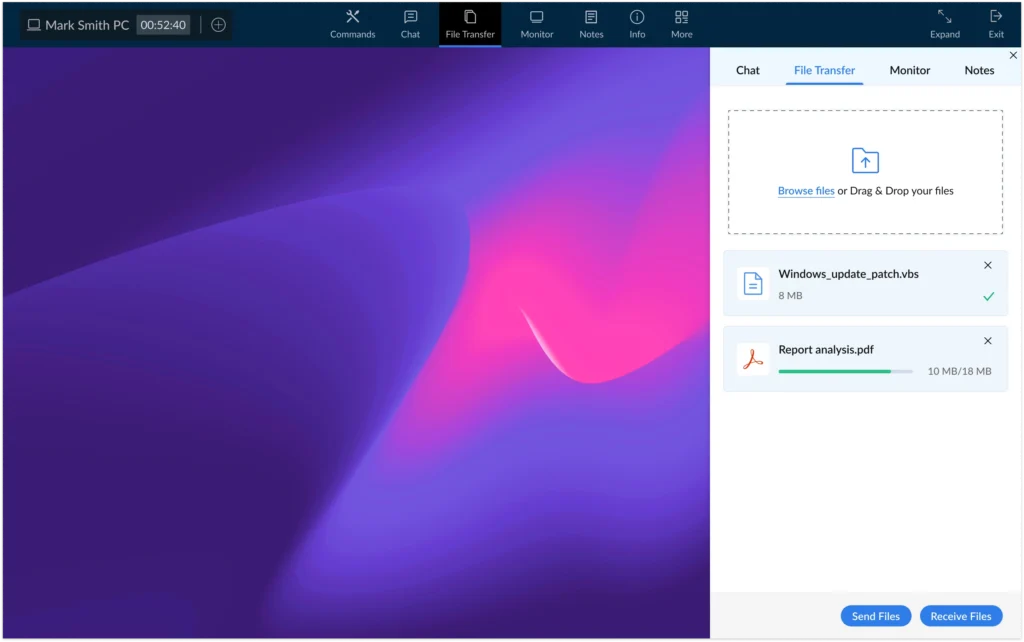
File Transfer
File Transfer allows technicians and users to securely exchange files during a remote session.
Common use cases include:
- Sending software installers
- Transferring scripts
- Collecting log files
- Sharing reports
- Delivering configuration files
Sending Files to a Remote Device
- Open a remote session.
- Select File Transfer.
- Click Browse Files or drag and drop files into the upload area.
- Review the upload queue.
- Click Send Files.
The selected files will be transferred to the remote device.
Receiving Files from a Remote Device
- Open File Transfer.
- Click Receive Files.
- Select the files you wish to download.
- Confirm the transfer.
Transfer Progress
The File Transfer window displays:
- File name
- File size
- Upload status
- Transfer progress
- Transfer completion status
File Transfer Security
Administrators can control file transfer behavior through security settings.
Organizations handling sensitive data may choose to disable file transfers for compliance purposes.
Clipboard Sharing
Clipboard Sharing enables technicians and users to copy and paste content between local and remote devices.
Supported content may include:
- Text
- URLs
- Commands
- Configuration values
Common Use Cases
- Copying PowerShell commands
- Sharing troubleshooting instructions
- Transferring configuration settings
- Copying system information
Security Considerations
Organizations can disable clipboard synchronization from Remote Access Preferences.
This is recommended for highly regulated environments where data movement must be restricted.
Disable Clipboard Sharing
Navigate to:
Remote Access → Preferences → Security & Privacy
Enable:
Disable Clipboard Transfer
When enabled, clipboard content cannot be copied between local and remote systems.
Multi-Monitor Support
Many modern workstations use multiple displays.
Zecurit Remote Access supports multi-monitor environments, allowing technicians to view and manage remote devices with multiple screens.
Benefits
- Improved visibility
- Better troubleshooting experience
- Support for complex workstation setups
- Easier navigation between applications
Switching Monitors
During a session:
- Click Monitor.
- Select the desired display.
- The selected monitor will be displayed in the viewer.
Typical Use Cases
- Financial trading workstations
- Engineering systems
- Graphic design environments
- Executive workstations
Multi-monitor support helps technicians troubleshoot devices exactly as users see them.
Session Confirmation Mode
Session Confirmation Mode allows organizations to notify users before a remote connection is established.
This feature enhances transparency and user awareness.
How Session Confirmation Works
When enabled:
- A connection request is displayed to the user.
- The user can approve or deny the request.
- The session begins after approval.
Benefits
- Increased user trust
- Better privacy protection
- Compliance with organizational policies
- Improved visibility into support activities
Recommended Scenarios
Session Confirmation is commonly used for:
- Employee support
- Contractor devices
- Shared workstations
- Privacy-sensitive environments
User Confirmation Settings
Administrators can configure confirmation behavior from:
Remote Access → User Confirmation
Available options may include:
- Always require approval
- Notify only
- Unattended access
- Approval exceptions
Session Notes
Session Notes allow technicians to document important information during a remote session.
Notes can be used to record:
- Troubleshooting steps
- Root cause findings
- Configuration changes
- Follow-up actions
- Customer feedback
Creating Session Notes
- During a remote session, select Notes.
- Enter the required information.
- Save the note.
Benefits
- Improved documentation
- Faster issue resolution
- Better technician collaboration
- Historical troubleshooting records
Organizations often use session notes as part of their support and audit processes.
Invite Technician
Invite Technician allows multiple support personnel to participate in the same remote session.
This capability is useful when troubleshooting complex issues that require collaboration between teams.
Common Scenarios
- Escalation to senior engineers
- Security investigations
- Network troubleshooting
- Training and mentoring
Inviting a Technician
- Open an active session.
- Select Invite Technician.
- Choose the technician from the list.
- Send the invitation.
The invited technician can join the session and collaborate in real time.
Benefits
- Faster issue resolution
- Knowledge sharing
- Reduced escalation delays
- Improved support quality
Quick Commands
Quick Commands provide immediate access to commonly used administrative functions without requiring navigation through the operating system.
These commands are available from the Commands menu.
Available Commands
Depending on operating system support and permissions, available commands may include:
Disk Cleanup
Launch cleanup utilities to remove temporary files and recover disk space.
Manage Accounts
Open account management tools to review local users and permissions.
Control Panel Settings
Access system configuration settings.
System Tools
Open administrative management tools.
Shutdown
Power off the remote device.
Restart
Restart the remote device.
Lock
Lock the remote workstation while leaving user sessions active.
Log Off
Sign out the currently logged-in user.
Benefits
- Faster administration
- Reduced navigation time
- Improved technician productivity
- Consistent support workflows
Session Preferences
Administrators can customize session behavior from the Preferences page.
Session Behavior Options
Available settings may include:
- Show Remote Cursor
- Open Viewer in Same Tab
- Open Viewer in New Tab
- Open Viewer in New Window
- Remove Quick Connect after Session
Session Timing & Expiry
Administrators can configure:
- Invite Link Expiration
- Idle Session Timeout
- Automatic Disconnect
- Disconnect and Lock
Security & Privacy Settings
Available options include:
- Lock Remote Computer on Disconnect
- Disable Clipboard Transfer
These settings help organizations enforce security policies while maintaining productivity.
Best Practices
To improve security and efficiency during remote sessions:
Use Session Notes
Document troubleshooting activities and important findings.
Enable Session Confirmation
Require user approval for employee support scenarios.
Review File Transfers
Monitor transferred files and restrict access where necessary.
Configure Session Timeouts
Automatically disconnect inactive sessions.
Lock Devices on Disconnect
Prevent unauthorized access after remote maintenance is completed.
Apply Least-Privilege Access
Grant technicians only the permissions required for their responsibilities.
As recommended by the National Institute of Standards and Technology (NIST), organizations should implement strong authentication, access controls, session monitoring, and audit logging to help secure remote access environments.
Related Articles
- Remote Connections
- Managing Devices
- User Confirmation
- Preferences
- Wake-on-LAN
- Remote Shutdown
- Security and Permissions