Overview
Manual Deployment lets you install or uninstall specific patches on chosen devices or groups, on your own schedule, instead of waiting for an automatic rollout. Each deployment is saved as a profile you can track, re-run, or review later.
What is Manual Deployment?
Manual Deployment, found under Secure → Deployment, is used to deploy specific patches to selected devices or groups. It is useful for one time fixes, urgent patches, or controlled rollouts where you need direct control over the deployment timing and target devices.
Every deployment you create appears in the profile list with its own status, so you can track whether it succeeded, is still running, or needs attention.
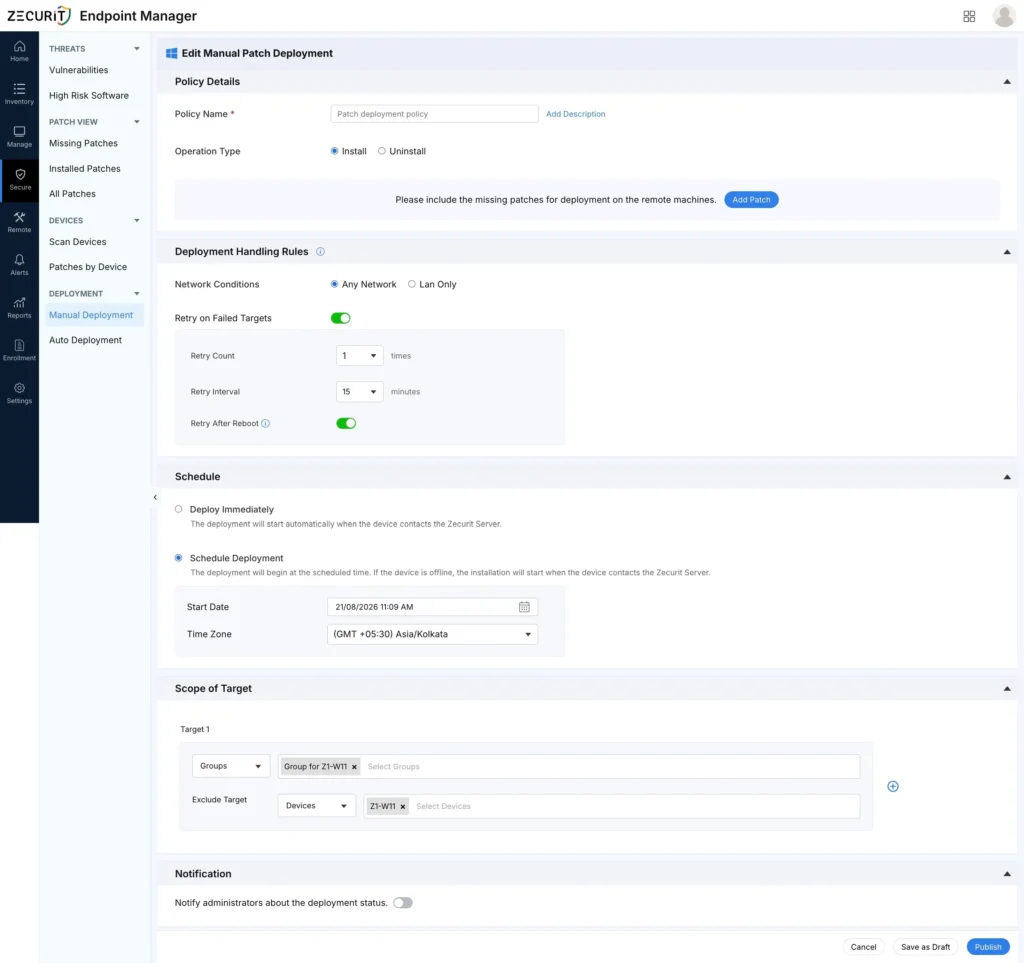
Step 1: Navigate to Manual Deployment
- Log in to the Zecurit portal.
- Go to Endpoint Manager → Secure → Deployment → Manual Deployment.
- Click Install / Uninstall Patch.
Step 2: Configure the Deployment
Configure the Policy Details, Deployment Handling Rules, Schedule, and Scope of Target sections.
Policy Details
| Field | Required | Description |
|---|---|---|
| Policy Name | Yes | A descriptive name for the deployment (e.g., “Patch deployment policy”). Shown in the profile list to identify it later. An Add Description link sits next to the field, letting you attach an optional, longer description of the deployment’s purpose. |
| Operation Type | Yes | Whether this deployment installs or uninstalls the selected patches. Choose Install or Uninstall. Install is selected by default. |
| Patches | Yes | The specific patches to deploy or uninstall. |
Adding and managing patches:
- Click Add Patch to open the patch picker and select one or more patches.
- Selected patches appear in a table below a Total Selected Patches counter (e.g., “Total Selected Patches: 1”), which updates as you add or remove patches.
- The table has the following columns:
| Column | Description |
|---|---|
| (checkbox) | Select one or more rows before using Remove Patch. |
| Patch ID | The internal identifier for the patch, for example 51871. |
| Title | The patch name and version, for example “Git – 2.50.1.” If the title is truncated, hover over it to see the full name in a tooltip. |
| Severity | A badge showing the patch’s severity rating, for example “Unknown,” Critical, High, or Low, depending on how the patch is classified. |
- Remove Patch is disabled (greyed out) until at least one patch row’s checkbox is selected. Check a row first, then click Remove Patch to remove it from the deployment.
Deployment Handling Rules
| Field | Description |
|---|---|
| Network Conditions | Choose Any Network to deploy regardless of connection, or Lan Only to deploy only while the device is on the local network. |
| Retry on Failed Targets | When turned on, automatically retries the deployment on any device where it failed. |
| Retry Count | How many times to retry a failed deployment before giving up. |
| Retry Interval | How long to wait, in minutes, between retry attempts. |
| Retry After Reboot | When turned on, retries the deployment after the device restarts, in case the failure was reboot-related. |
Schedule
| Option | Effect |
|---|---|
| Deploy Immediately | The deployment starts automatically as soon as the device contacts the Zecurit Server. |
| Schedule Deployment | The deployment begins at a chosen Start Date and Time Zone. If a device is offline at that time, it starts when the device next contacts the Zecurit Server. |
Scope of Target
Targets are configured one row at a time, and each row is numbered as you add it the first is labeled Target 1, the next Target 2, and so on.
For each target row:
- Use the type dropdown on the left (e.g., “Devices”) to choose whether this target row applies to Devices or Groups.
- Use the search field next to the dropdown to find and select the specific devices or groups. Each selection appears as a removable chip inside the field (for example, campbell ). You can select multiple devices or groups within the same target row.
- To add another target, click the + icon at the end of the row. This creates a new numbered target row (Target 2, Target 3, …), which can use a different type (Devices or Groups) and its own selections.
- To exclude specific devices from the overall scope, use Exclude Target and select the devices to leave out of the deployment, even if they belong to a selected group.
Note: Confirm the Exclude Target control’s exact location in your environment before publishing this section it may only appear after at least one target has been configured, rather than being visible from the start.
Step 3: Publish or Save as Draft
Click Publish to run the deployment according to the configured schedule, or click Save as Draft to complete the deployment later.
| Option | Effect |
|---|---|
| Publish | Activates the deployment according to the chosen schedule. |
| Save as Draft | Stores the deployment configuration without activating it, so it can be reviewed or completed later. |
| Cancel | Discards changes and exits without saving. |
Understanding the Profile List
| Column | Description |
|---|---|
| Profile Name | The name given to the deployment when it was created. |
| Platform | The operating system the deployment targets. |
| Created By | The user who created the deployment. |
| Created Time | The date and time the deployment was created. |
| Version | The current version number of the deployment profile. |
| Associated Devices | How many individual devices the deployment targets. |
| Associated Groups | How many device groups the deployment targets. |
| Profile Status | The current outcome of the deployment. |
Profile Status Values
| Status | Meaning |
|---|---|
| In Progress | The deployment is currently running on its targeted devices or groups. |
| Executed | The deployment completed successfully. |
| Failed | The deployment did not complete successfully on one or more targets. Check the target devices for connectivity or agent issues. |
Best Practices
- Name deployments clearly enough that they’re identifiable later in the profile list without opening them.
- Turn on Retry on Failed Targets for unattended deployments, so temporary connectivity issues don’t require manual follow-up.
- Use Lan Only for large patches where you want to avoid consuming bandwidth on remote or metered connections.
- Review Failed deployments promptly rather than assuming a retry will resolve the issue on its own.
- Use Schedule Deployment for planned maintenance windows instead of deploying immediately during business hours.
Troubleshooting Tips
| Issue | Resolution |
|---|---|
| Publish button is disabled | Confirm a Policy Name is entered and at least one patch has been added. |
| Profile Status shows Failed | Check the target device’s connectivity and agent status; enable Retry on Failed Targets if not already on. |
| Profile Status stuck on In Progress | Confirm the target devices are online; offline devices only pick up the deployment once they reconnect. |
| Deployment didn’t run at the scheduled time | Confirm the Start Date and Time Zone were set correctly, and that the profile was Published, not left as a draft. |